


How to Share an Item from the Workspace
There are various steps to share an item from the workspace:
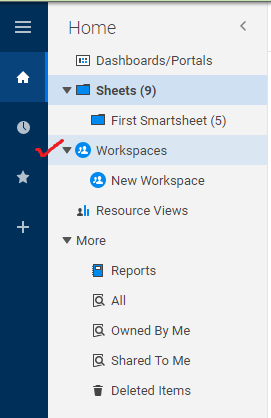
- First, click on the Menu Menu icon is present at the upper-left side of the Smartsheet window.

- Next, from Home, click on the Workspace option in which the sheet items reside.
- We have to right-click on the name of the item and then click on the Share option so that the sharing form will be open.
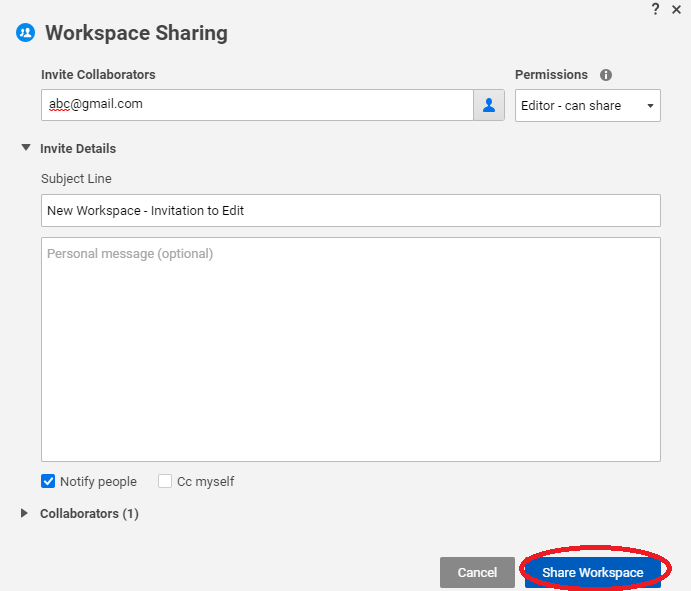
- Next, we have to click in the Invite collaborators box and then choose or type the contacts in which we want to share an item.
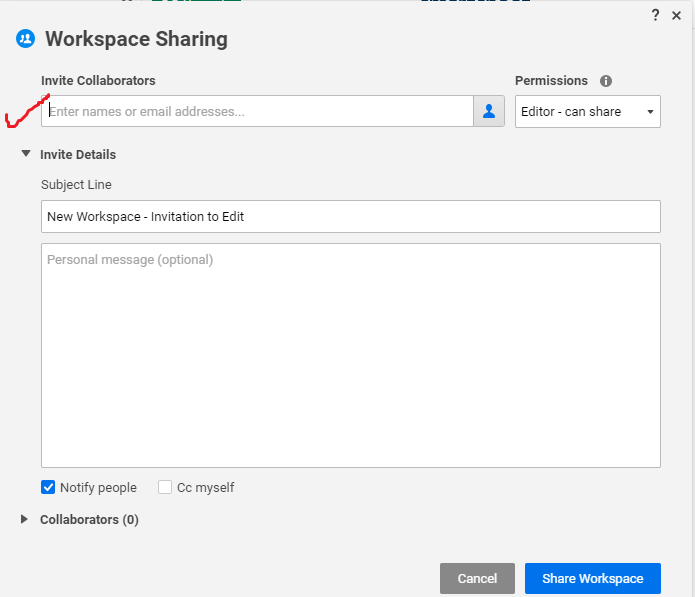
- Last, click on the share button if we only want to share the sheet items, but if we want to share the workspace, then we have to click on the Share Workspace.
How to Set a Default Sharing View
If you want to set a default sharing view, then you must have the admin-level sharing permissions, or you should be the owner of the sheet.
There are various steps to set a default sharing view:
- First, to display the sharing window, click on the share
- Next, select collaborators so that the list of the current smartsheet user can be displayed.
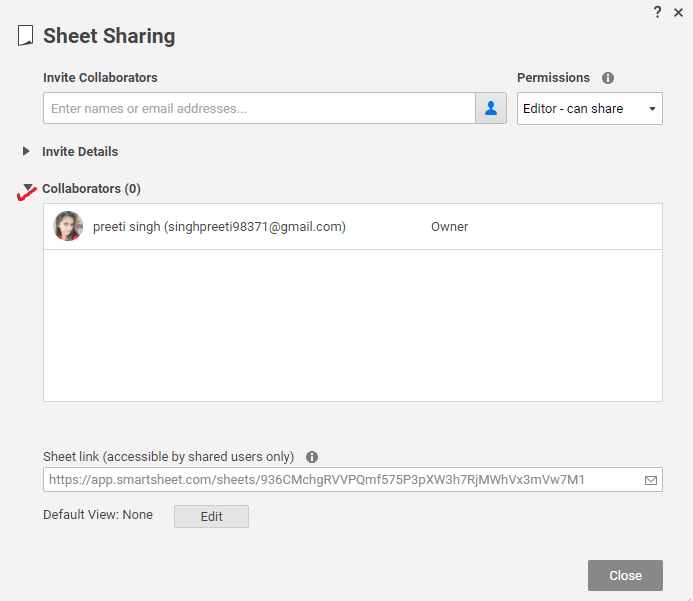
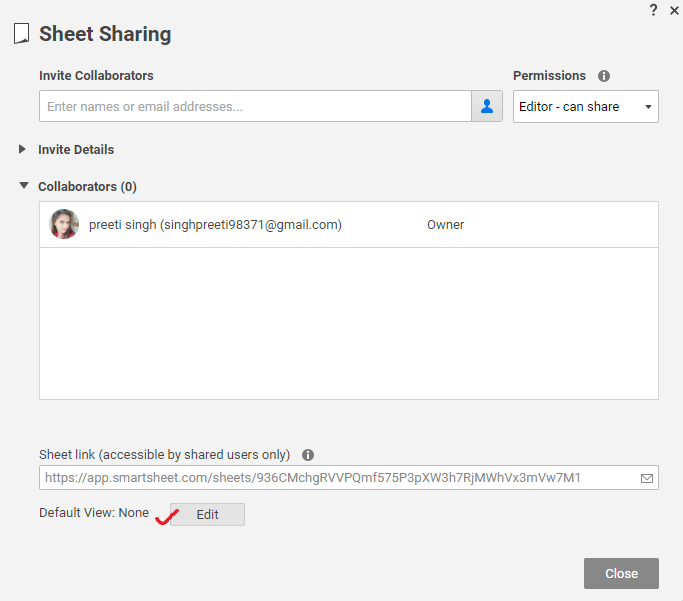
- Next, we have to select the Edit button, which is at the right of the Default view.
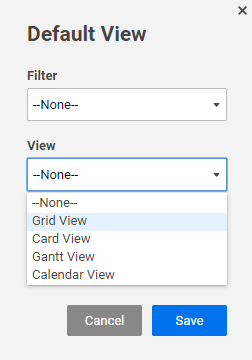
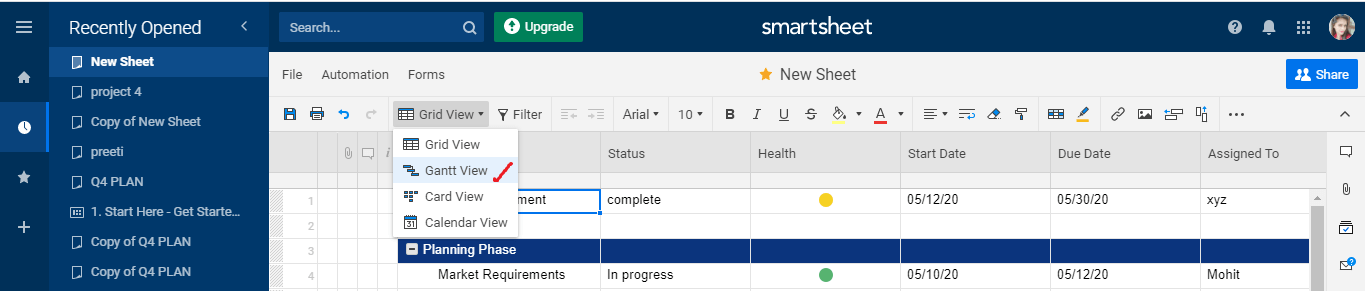
- Select any view among all the view types such as Grid view, Card View, Gantt View, or Calendar View. We can also select default card view lanes and filter if needed.
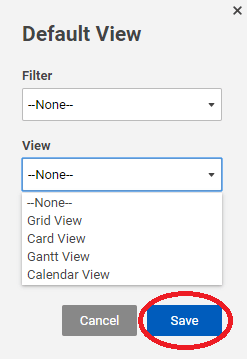
- Click on the Save
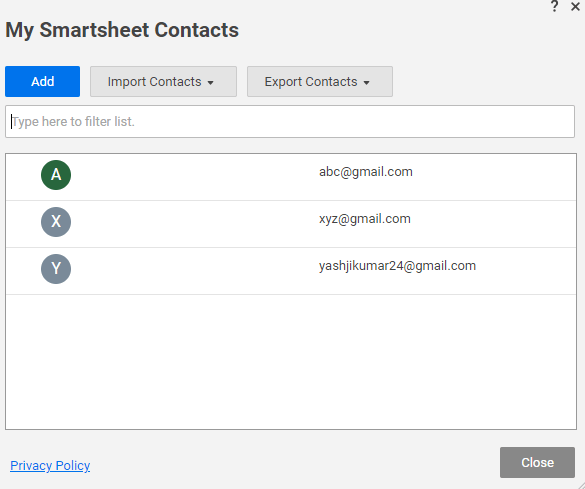
Contacts in Smartsheet
In the Smartsheet, with the help of the contact feature, we can easily assign the task, and sharing of sheets with vendors, colleagues, and clients. In the Smartsheet, we have two kinds of Smartsheet contact list one, the account list, and another one is My Smartsheet Contacts. The account list is handled by the System Administrator. My Smartsheet Contacts are used to share a smartsheet with collaborator and customers who are not the part of the organization.
In the Smartsheet, contacts can also be imported from other email services such as Yahoo Mail, Gmail, Hotmail, etc.
How to Add Contacts to My Smartsheet Contacts
Bulk Import Contacts
There are various steps to import contacts:
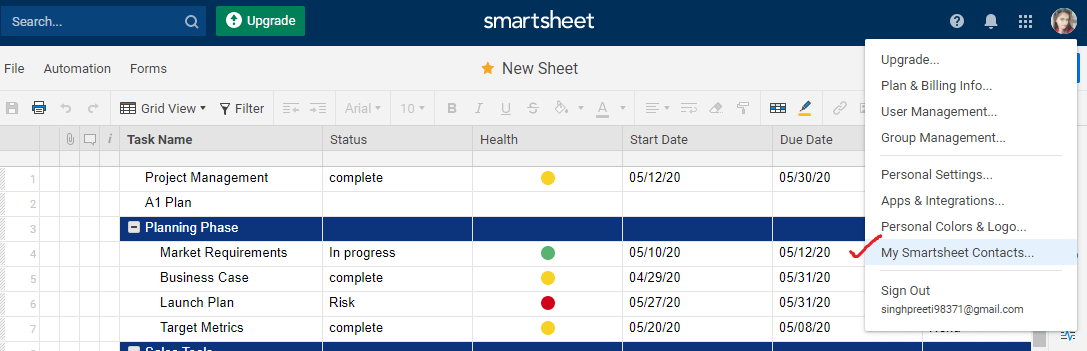
- First, click on the Account then click on My Smartsheet contacts.
- Next, click on the Import Contacts and choose Gmail, .csv (Yahoo, Outlook), or vcf (vCard File).
There are various steps which we have to follow for the kind of contact we want to import:
- Gmail: - Choose that contact, which we need to import into the smartsheet and click on the option named Import.
- .csv (Outlook, Yahoo, etc.): - Choose .csv file, and then click Continue. Select the contact, which we need to import into the smartsheet and click on Import.
- .vcf (vCard File): - Select vCard file, and then click on the Continue, and click on Import.
In your My Smartsheet, the contacts will be added.
Add Contacts Individually
There are various steps to add contacts individually:
- First, click on the Account.

- Click on the option named My Smartsheet Contacts.
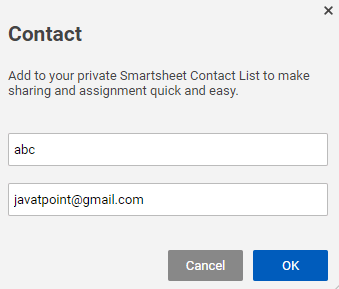
- Next, click on the Add button in my smartsheet contact form, so that the contact window is displayed.

- Last, we have to type the contact name and the email address and then click on OK.
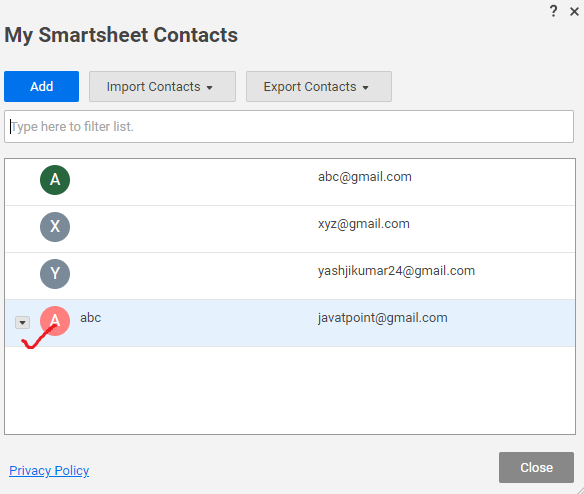
In the list of contacts, the new contact is added.
How to Edit or Delete Contacts in the Smartsheet
There are various steps to edit or delete contacts in the Smartsheet:
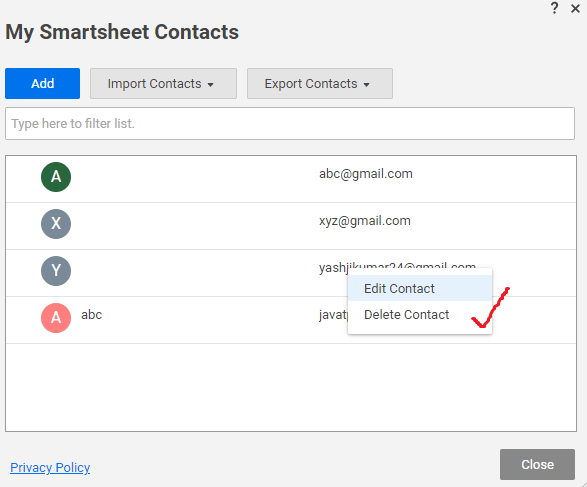
- Click on Account then click on the My Smartsheet Contacts. Then the My Smartsheet Contacts form will be display.

- Next, right-click on that contact, which you want to delete or edit and then Select the option named Edit Contact or Delete Contact.
How to Export Contact from your Smartsheet Contacts List
There are various steps to export contact from your smartsheet contacts list:
- Click on the Account.

- Then, click on the option named My Smartsheet contacts, and then the My Smartsheet Contact form will be displayed.
- Next, click on the option named Export Contacts and then click on .csv.
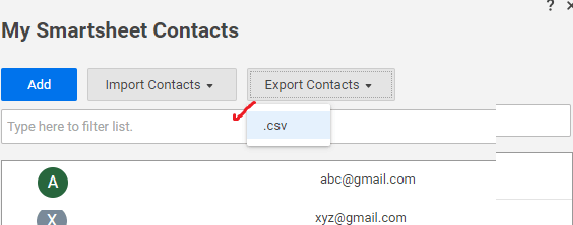
You will export the contacts from your my Smartsheet Contacts list as a.csv file to the place where the downloads are stored in the computer.
Groups in Smartsheet
In the Smartsheet, groups are created for providing easy and fast control access to sheets and workspaces. In a group, we can easily add new team members. We can also remove an existing member from the group if they leave the organization.
How to Create a Group in Smartsheet
There are various steps to create a group in Smartsheet:
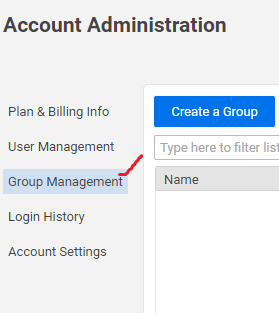
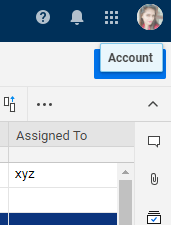
Step 1. First, click on the Account.
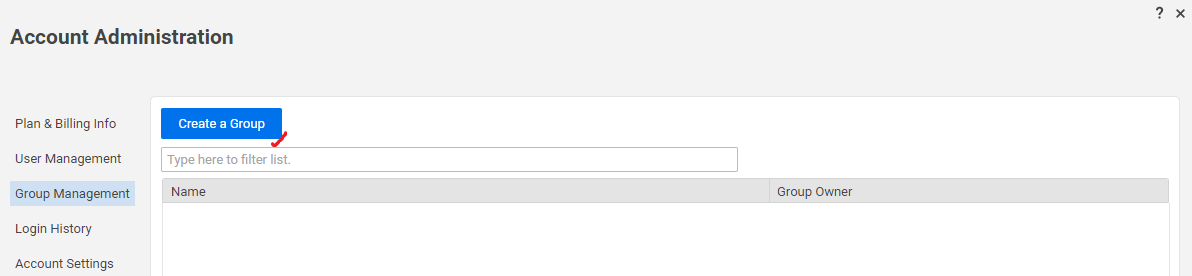
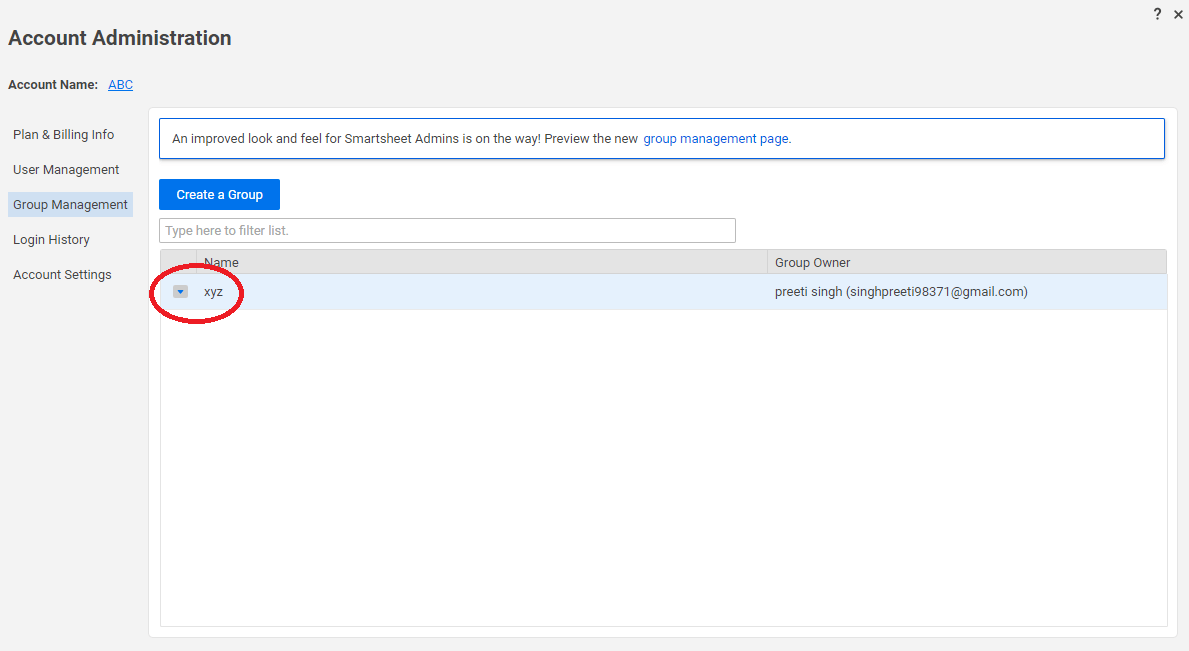
Step 2. Then, click on the option named Account Admin. After that, click on the Group Management option. Then the Group Management form will be displayed which contains the list of all the groups that are already present in the Smartsheet.
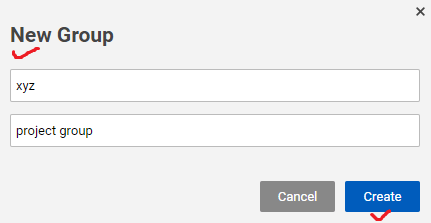
Step 3. Next, we have to click on the Create a Group button so that the New group form appears.
Step 4. Give a name to the group and also give its description.
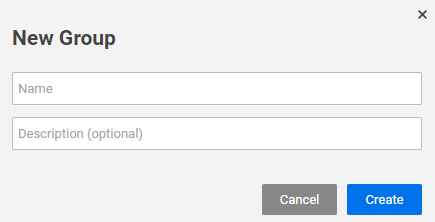
Step 5. Click on the Create option.
Then the form will display, and it contains the list of all the current team group members. By default, only your email address will be comprised to it.
Step 6. Click on the Add to Group button if you want to add new members into the group.
Step 7. Next, type the name and email address of the contact in the Smartsheet contact list, and the contact that we typed will be displayed in the drop-down list through auto-resolve.
We can type any kind of contact that we want. But the contact should not be a part of the multi-user plan or the current smartsheet user.
Then the form named Add to Group will be updated so that the contacts list which we selected will be displayed. Then, click on the Save button to finish the addition of the contacts to the group.
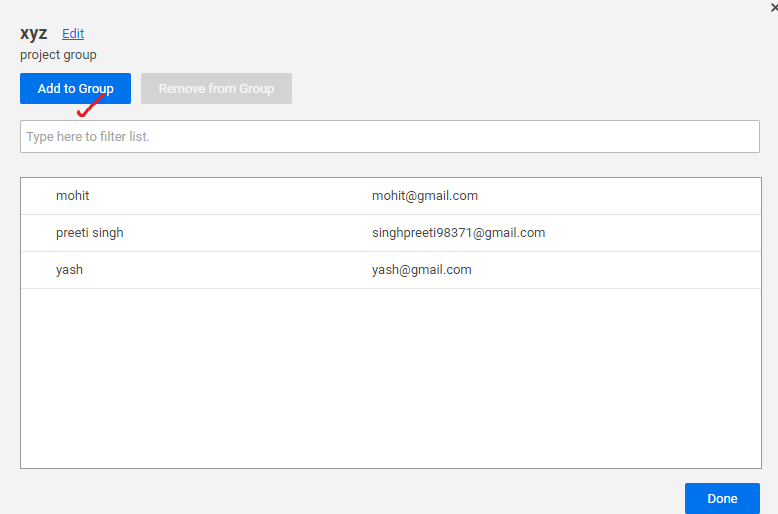
Step 8. Next, we will add all the desired contacts into the group and then click on the Save button.
How to Manage an Existing Group
With the help of the group owner or the system admin, a group can be managed.
There are various steps to manage an existing group:
Step 1. First, click on the Account.
Step 2. Then, click on the option named group management so that the existing contact list appears, which is created by the group admin.

Step 3. Next, to do a modification in the group, click on the drop-down arrow, which is present on the left side in the Account Administration box.
There are various options available to manage a group:
Edit Group: - The Edit group contains a list of members in the group. There are various operations we can perform with the edit group.
- Add Members to the Group: - By using the option named Add to Group, we can add the new contacts in the group.
- Remove Members from the Group: - By using the option called Remove from group, we can remove the contact from the existing group.
- Edit Group Name and Description: - Using the option named edit group name and description, we can edit the group name and the group description.
How to Share a Smartsheet Item with a Group
There are various steps to share a Smartsheet item with a group:
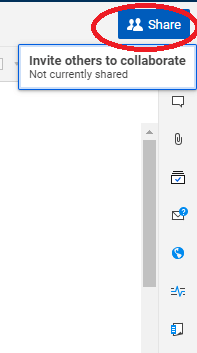
- First, click on the Share button, which is present at the right side of the Smartsheet window.
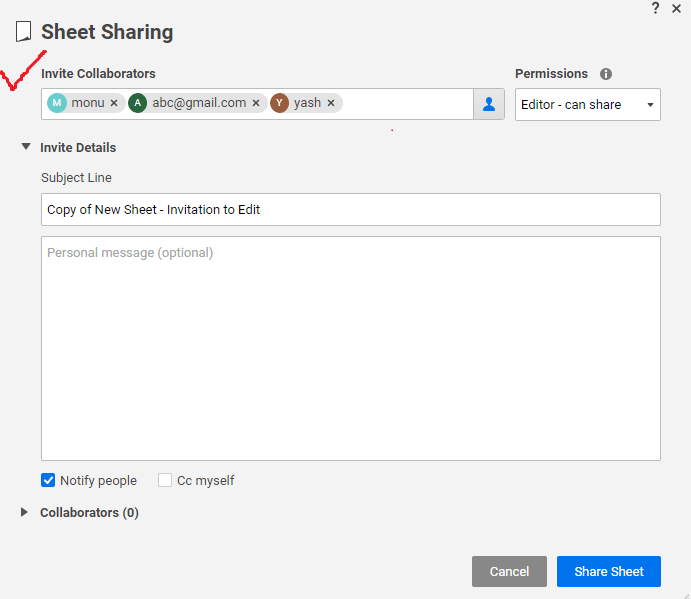
- Then, the Smartsheet sharing form will be open, and in this form in the Invite Collaborators box, we have to type the group name, or we can also click on the select contact icon so that the group name can be chosen from the list of the contacts.
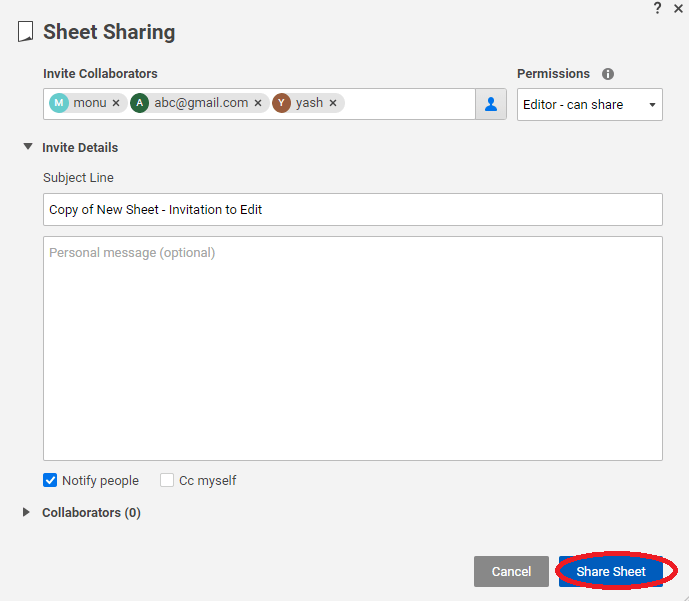
Step 3. Last, we have to click on the share sheet button.
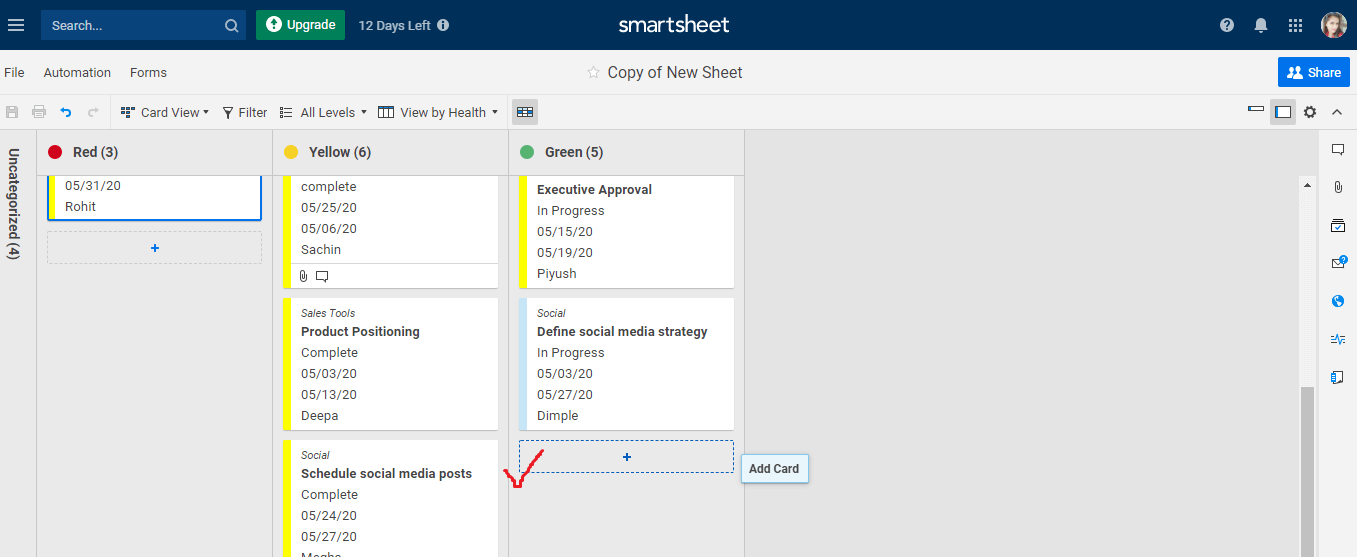
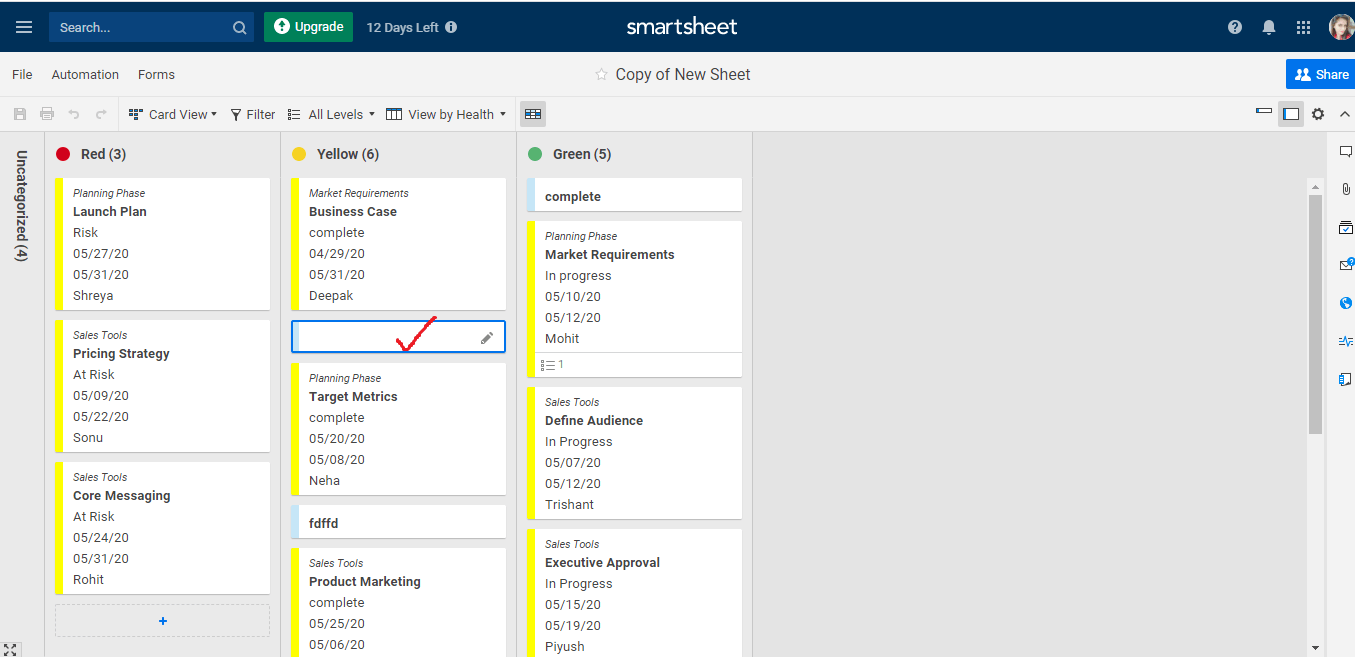
Card View in Smartsheet
There are four types of views used in Smartsheet. The card view is one of them. In the Smartsheet, the card view is used to view a sheet. With the help of card view, collaborators can easily share, see, and act on the projects together with the drag-and-drop cards so that work can be easily organized and prioritized. Card view is based on the agile project management methodology, but we can offer it to any team along with more visual methods so that the collaboration and communication can be done easily in the Smartsheet.
Card view is used for organization and prioritization of work. Card view is drived by the different column types such as contact list, drop-down list, and the symbol, which offer numerous selections.
Card view comprises information from the sheet's rows and on the basis of the drop-down list values, it is grouped. With the help of drag and drop, a card can be re-ordered, and we can also customize the cards so that the different fields can be displayed.
In the Card View, with the help of the cards, work items or tasks are made up in our project. On the cards, field values show the information regarding the task. There are 10 fields in which the card can display 1 field for title filed, and the remaining 9 is used for other purposes.
There are some essential points about the card view:
- In the card view, the primary column in the sheet contains the title of the card.
- The information regarding the tasks is displayed by the fields on the card.
- The icon named reminders only appears if you set the reminder for the task in the Smartsheet.
- Comments and attachment icons are only displayed if the task contains these items.
How to Create a New Card
There are various steps to create a new card. We have to follow one of the following:
1. If we want to add the card in the lane:
- Click on the icon named Card icon, at the end of the card's list.
- Right-click on the card and then click on the Insert Above or Insert Below.
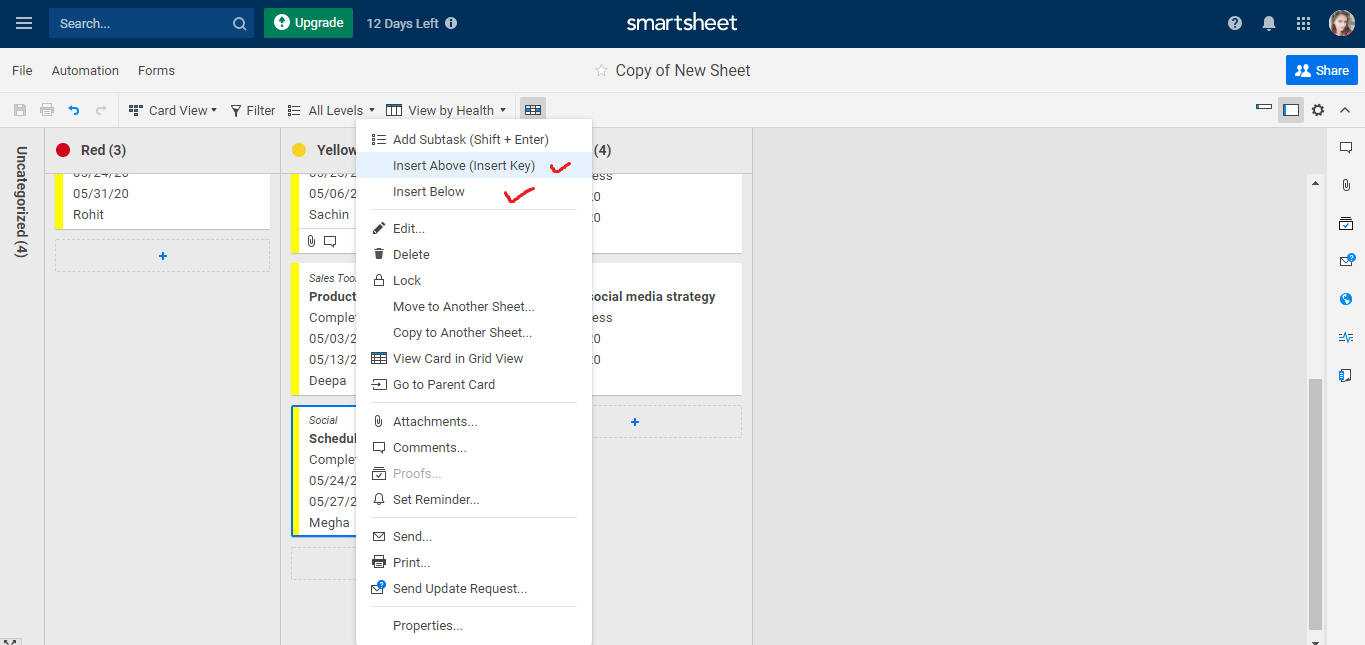
2. Then, fill the details in the edit form, and then click on the Enter button.
How to Edit a Card
Add Data to a Card
There are various steps to edit or add data to a card:
- First, double-click on the data which you want to edit or add, and then the Edit form will open.
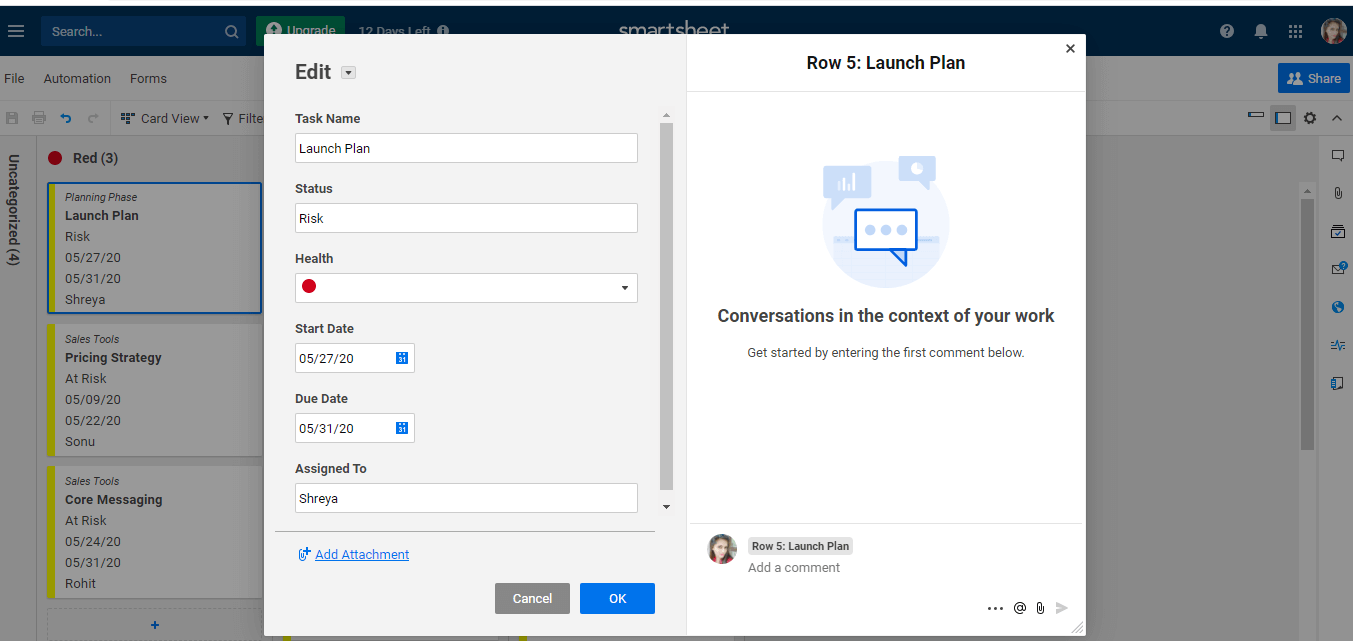
- Next, make the changes which you want and then click the below figure shows the edit form after changes.
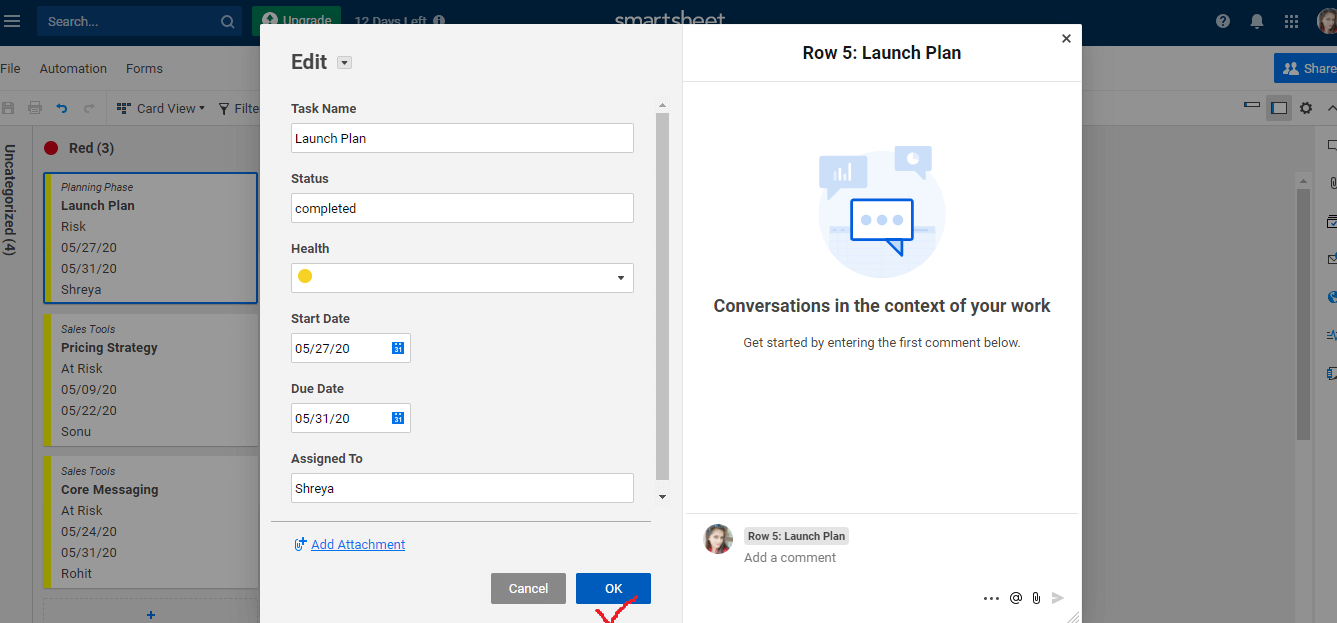
If we want to insert an image in a card, then first, remove the content of a field, or add a hyperlink then click on the arrow, which is next to the field name, which you need to edit.
How to Change a Color Bar for a Card
We have two ways to change a color bar for a card:
- Manually, we can change the color.
- Automatically with the help of the conditional formatting rule, we can change the color.
How to change a color manually
There are various steps to change the color manually:
- First, right-click on the edge of the card.
- Then, choose the color.

How to change a Card color automatically by using conditional formatting
We can change the color of the card automatically with the help of the conditional formatting only if we have the Admin or Owner-level sharing permissions.
Basic Gantt View
Gantt view is another view which we used to view the sheet. Gantt's view provides you a visual timeline of your work. We use a Gantt chart in the waterfall model. Gantt chart is useful when we want to see the visual representation of our schedule.
For Gantt view, it is must that in our Smartsheet, there are columns in which one contains a start date, and the second contains end date.
With the help of the Gantt chart, we can do the following:
- We can see the critical path of the project.
- We can use hierarchy so that we can create the rows summary to the further organization of the project.
- We can display the 100 % completion of our tasks.
- We can see the dependencies and also track the relationship between the tasks.
How to Add a Gantt Chart
There are various steps to add a Gantt chart:
- First, it is must that our sheet contains at least two date columns, the first column is used for the start date, and the second column is used for the end date.
- Then, in the toolbar, select the Gantt view icon so that the tasks appear in a timeline view based on their start date and finish date.
The Gantt chart will be displayed on the right side of the columns, and the divider divides the screen between the grid columns and the Gantt chart.
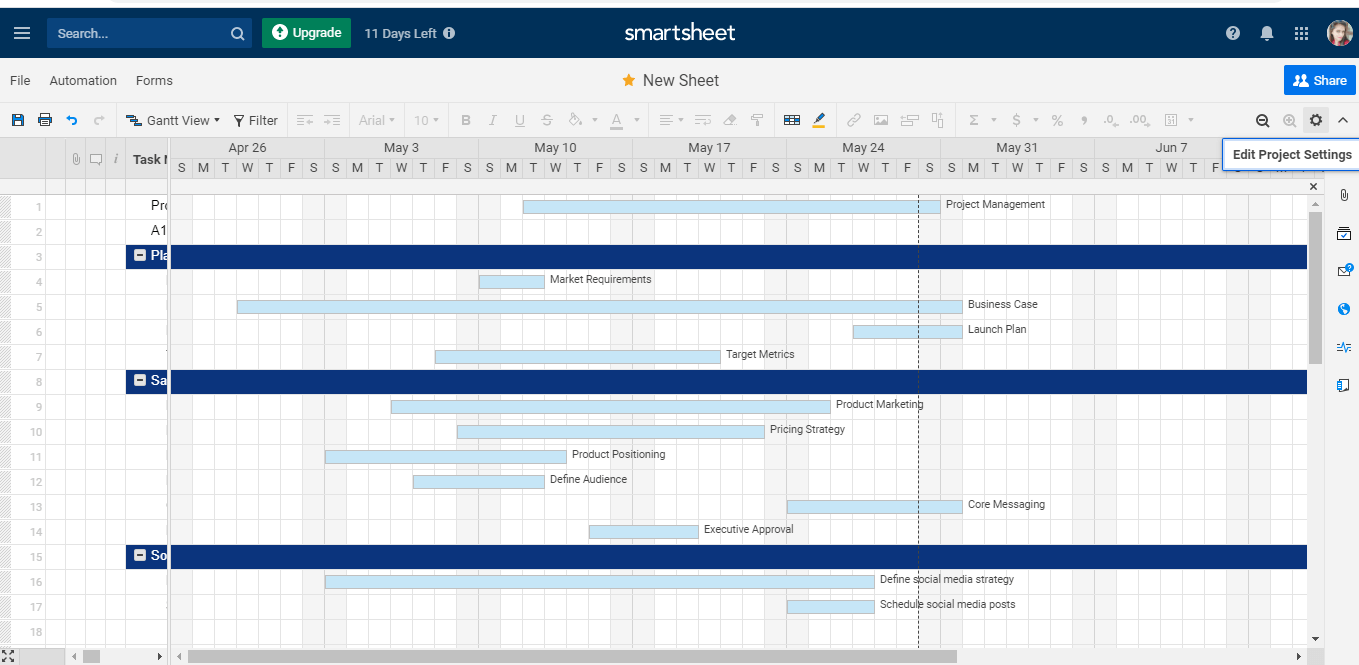
- Next, in the Gantt Chart header, click on the icon named Project Settings to check that the Gantt chart is using the appropriate columns for the start date and the end date.

Adjust the Project Settings
There are various steps to adjust the project settings:
- In the toolbar, click on the project setting icon.
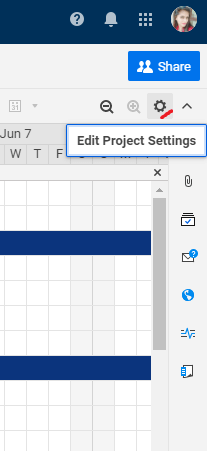
- Then, the project setting form will appear.

We can perform the following to the project setting:
- For the automatic calculation of the task duration, enable the dependencies.
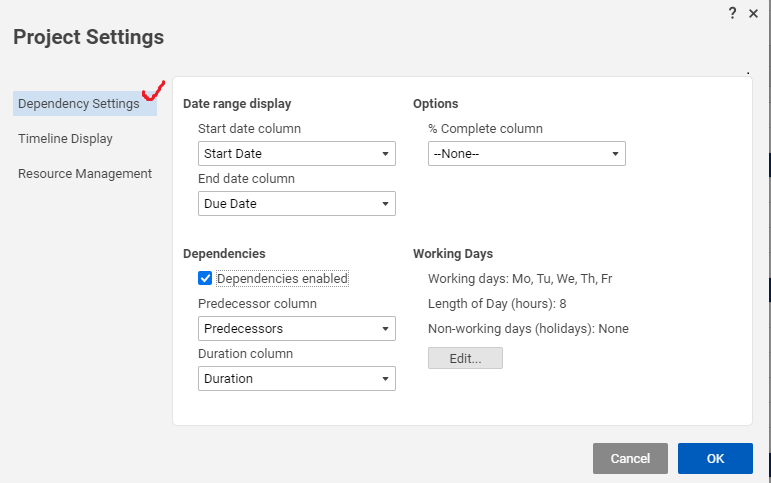
- We can configure the holidays and non-working days.
- We can alter the Primary and Secondary Timeline Displays.

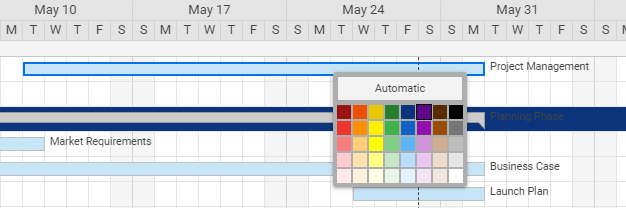
How to Apply Color to the Gantt Bars
If we want to change the color of the Gantt bar, follow the following steps:
- Right-click on that bar to change the color and select the option named Color Settings.
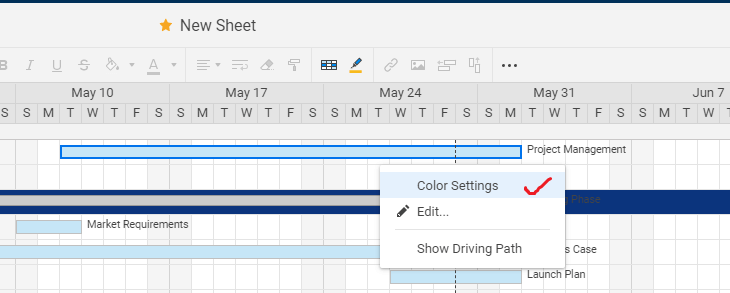
- Then, the color dialog box will appear, and then we can change the Gantt bar's color.
How to Adjust the Gantt Chart Timeline
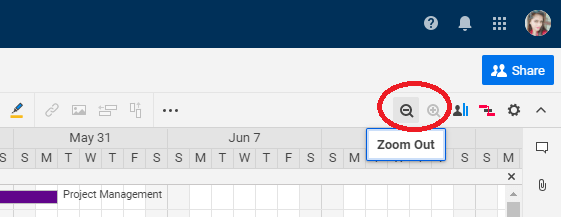
We have 4 timelines zoom levels in the Smartsheet such as day, week, month, quarter. If the person has sheet's access than he/she can easily modify the timeline zoom level. So, if we want to modify the timeline zoom level then by clicking on the icon named Zoom in, or Zoom out that are present in the header of the Gantt Chart, we can modify.
Calendar View
The calendar view is another view which we use in Smartsheet. With the help of the calendar view, we can easily and interactively customize the view of our work on a calendar format. We can also overlay or publish the Smartsheet calendar on the Google calendar or Apple calendar.
In the Smartsheet, if you want to make a calendar, then it is must that we have one date column. As Grid view and Gantt view, the calendar view is also driven by the different column types in the sheet.
Proofing
In the Smartsheet, with the help of proofing, stakeholders can easily approve and review the team's content. By using proofing features in the smartsheet, the team can upload the content, from the stakeholder's request for the feedback, and get approvals by using a simple, streamlined approval process.
Proofing can be used:
- To provide particular information about a product design mock-up.
- Proofing is used to leave annotated comments and markups in PDFs and images.
- Proofing is used for review and annotate language modifications required on documents.
How to Enable Proofing on a Sheet
There are various steps to enable proofing on a sheet:
- First, click on the icon named Proofing, which is on the upper-right side of the window.
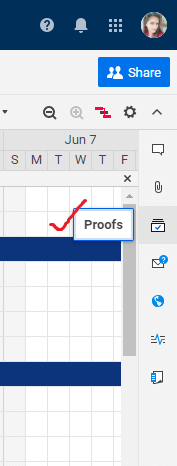
- Then, the Proofing panel will be displayed.
- Next, switch the Enable proofing on this sheet to on. The enable proofing on this sheet option is present at the bottom of the proofing panel.
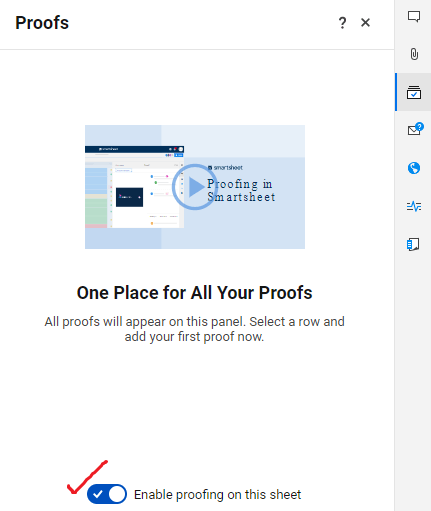
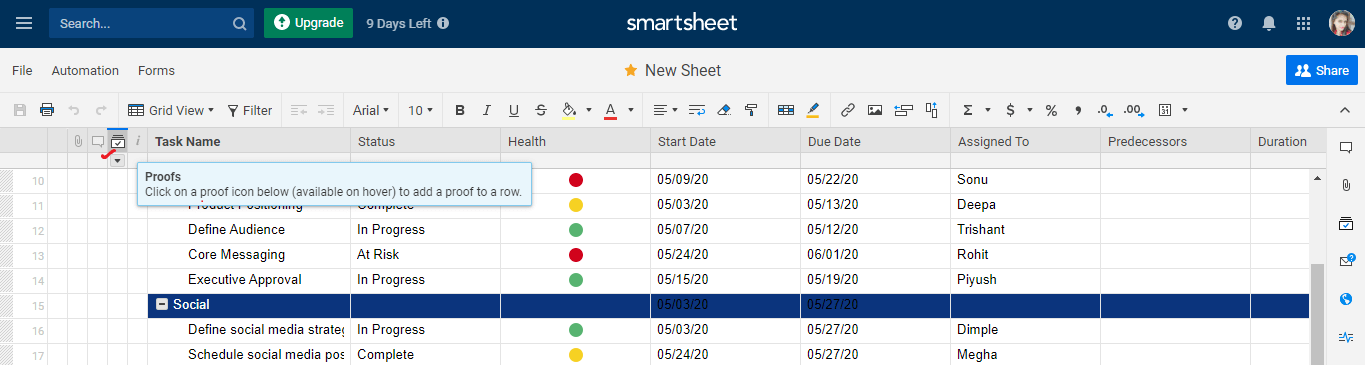
- Then, the proof column will be added to the sheet, and the proof column is added to the right of the attachment column, and this column is used to upload proofs for the review.
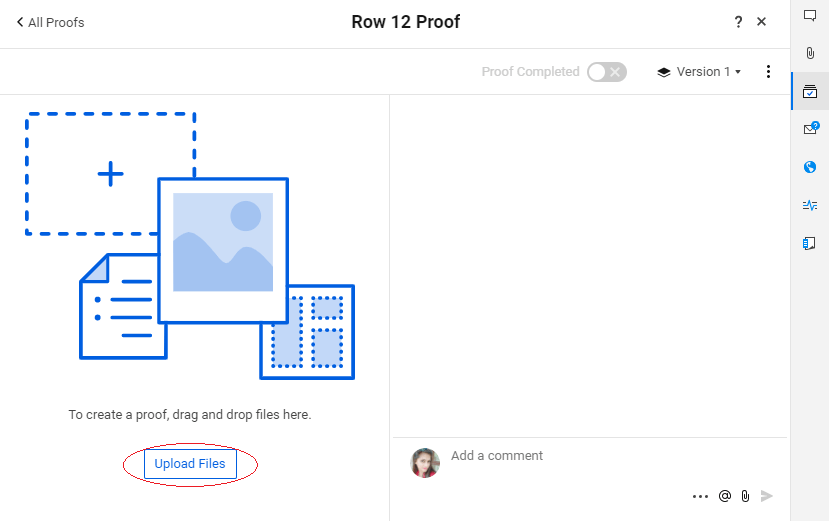
How to Upload a Proof
When proofing is enabled, then we can upload the proofs for review.
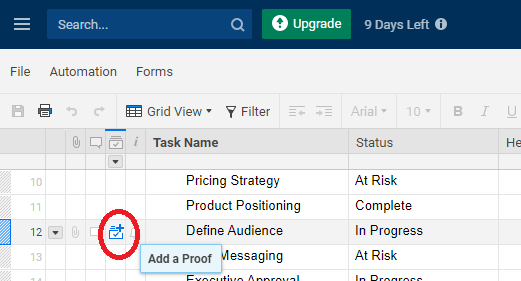
There are various steps to upload a proof:
- First, click on the Add a proof icon to that row where we want to add the proof so that the Proofs panel will be displayed. The upload file panel is present in the Proofs panel.
- Next, to locate and upload the file for proofing, click on the option named Upload File.
How to Create a Review Request
To receive a proof review request, it is must that a person has a valid email address.
There are various steps to create a review request:
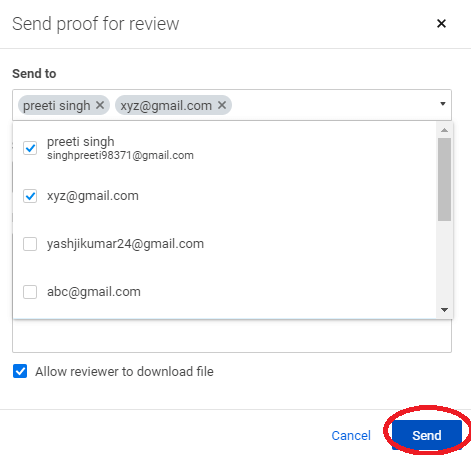
- First, choose the proof which you need others to review then select the option named Request Feedback, present at the top of the proofing panel.

- Next, in the Send proof for review window, type the person's name or email address which you need to review your proof.
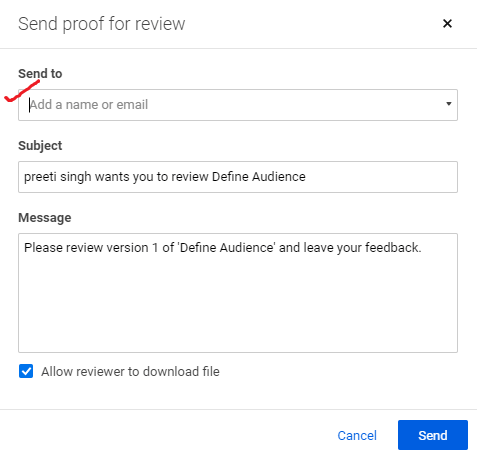
- Next, we have to check the information contained in the Subject and the Message box to check that the information is the same that you want to send your reviewers.
- Then, click on the Send button.
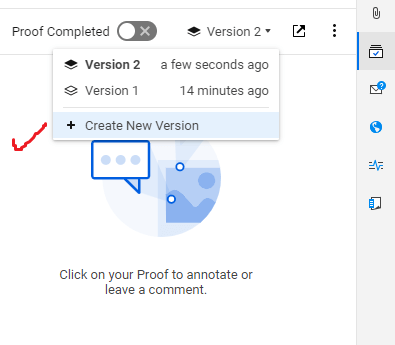
How to Upload a Version of a Proof
There are various steps to upload a version of the proof:
- First, click on the Version, present at the upper side of the right side of the proofing panel.
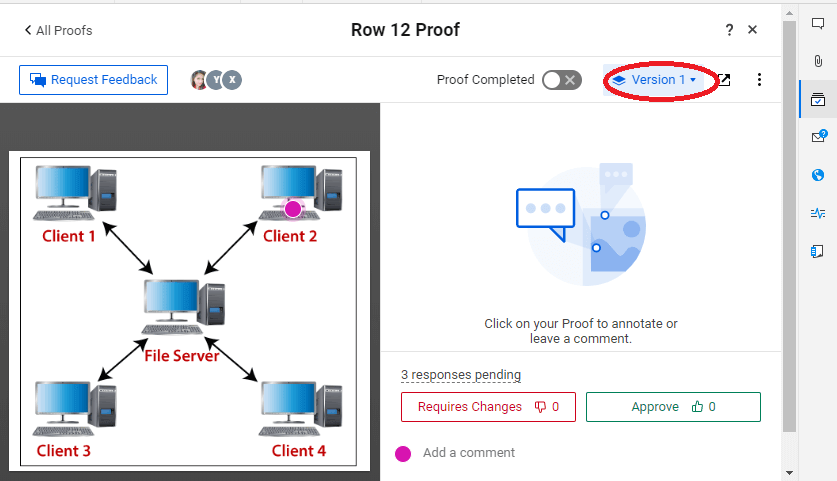
- Then, select the option named Create New Version.
- Next, we have to click on the option named Upload File button, present at the left side of the proofing panel.
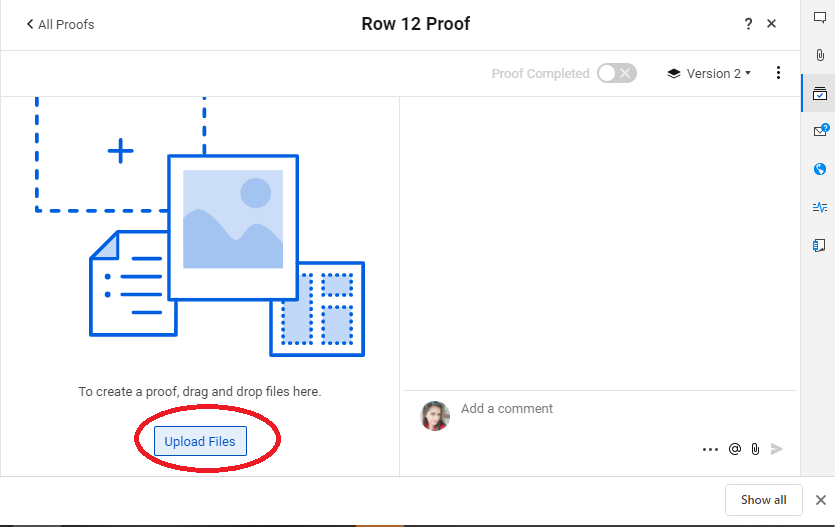
- Last, choose the file from the computer which you want to upload and then upload (file can also be dragged from the upload section of the panel).
0 Comments