


How to Delete an Attachment from the Comment Panel
There are various steps to delete an attachment from the comment panel.
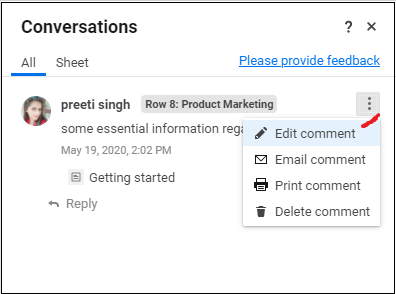
Step 1. First, click on the icon named More Options, which is present on the right side of the comment panel.
Step 2. Select the option named Edit Comment.
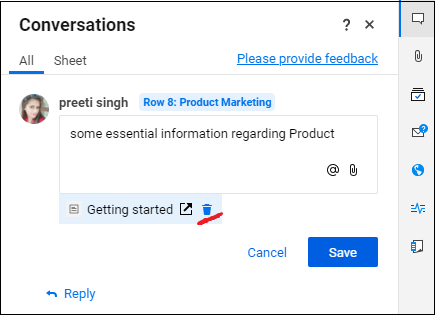
Step 3. Next, we have to move the mouse over the attachment, which we want to delete, and then click on the trash icon.
Conditional Formatting in the Smartsheet
In the Smartsheet, conditional formatting is used to create the rules on the sheet. So, the conditional formatting helps us to create the rules on the sheet. Because of the Conditional formatting, the appearance of the sheet cell is changed.
How to Create a Conditional Formatting Rule
There are various steps to create a conditional formatting rule:
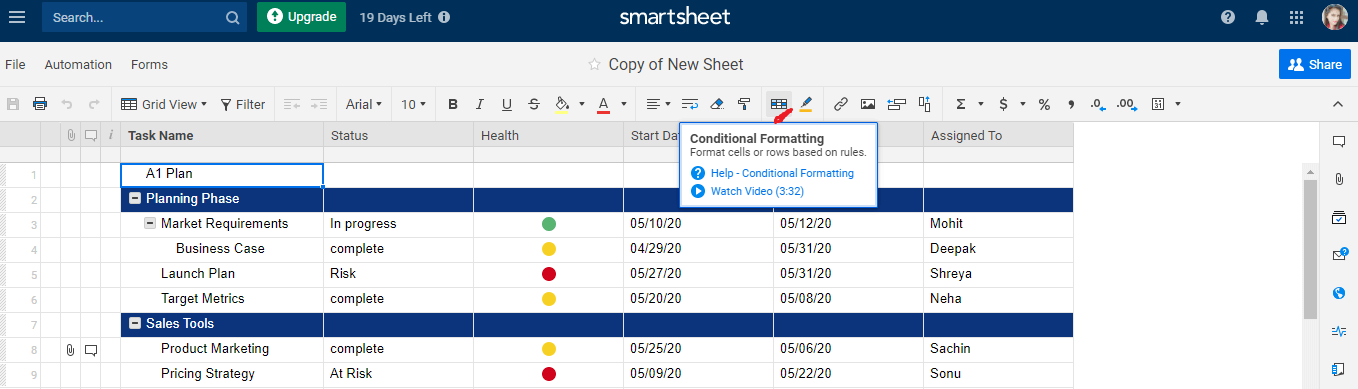
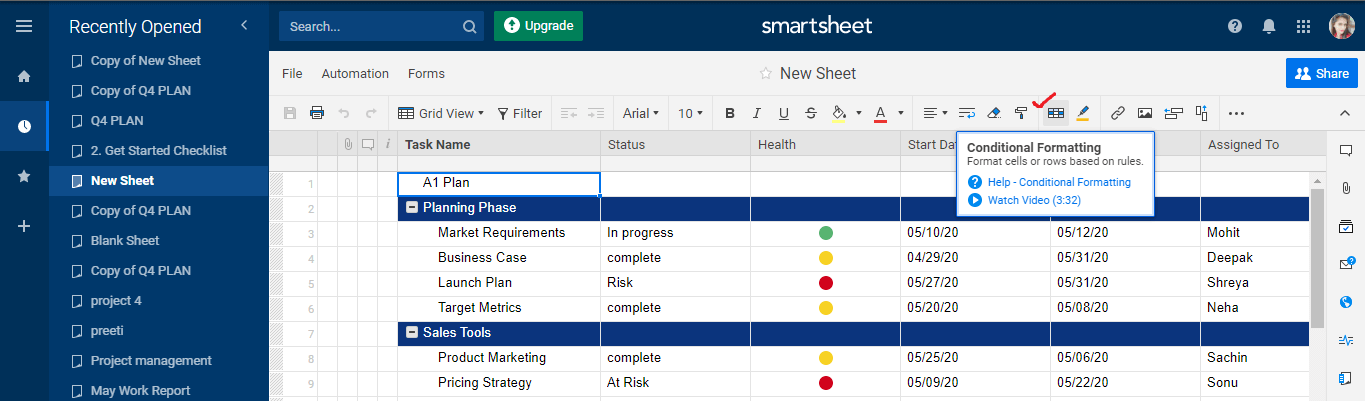
Step 1. First, on the toolbar, we have to click on the conditional formatting icon so that the conditional formatting window is displayed.
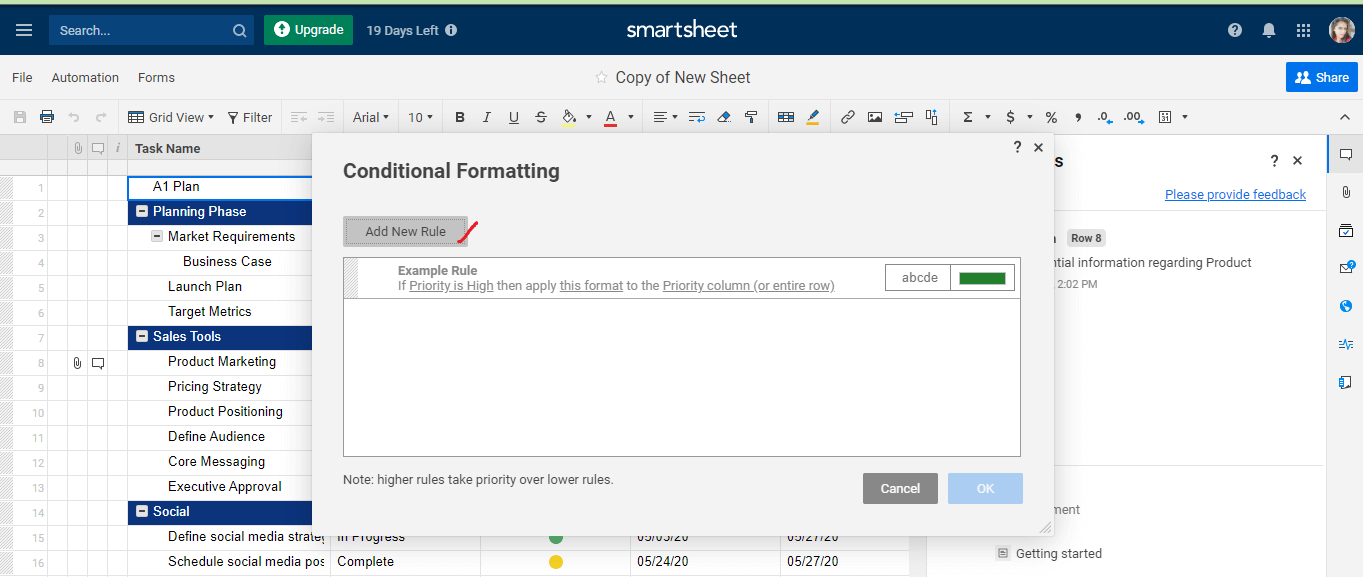
Step 2. Next, to make a new conditional formatting rule, click on the option named Add New Rule.
How to Set the Conditions for the Rule
There are various steps to set the conditions for the rule:
Step 1. First, click on the Set Condition option so that the set condition window is displayed.
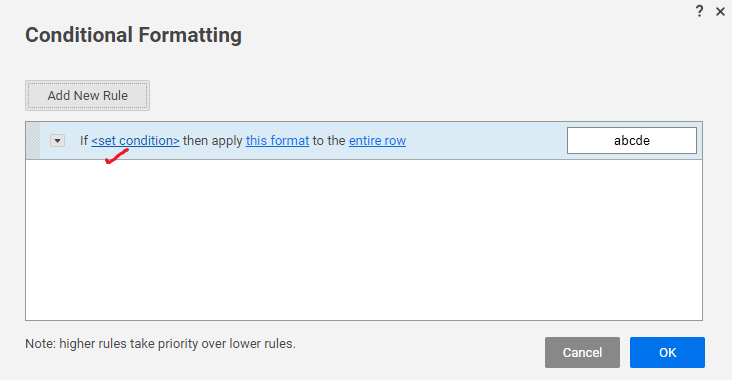
Note: The criteria differ based on the type of the column. For example: If the column type is a date, then we can only apply the formatting on the basis of the date means the date in the past or date in the next days. If the column is a checkbox type, then we can only apply the formatting on the basis of the checked box, or unchecked box.
Step 2. If we want to customize the rule again, then click on the defined custom criteria option.
Step 3. If we want to display the formatting on the rows where the condition is not applied then choose the checkbox to use format when the condition is not met.
Step 4. Next, when all the conditions are set, then click on OK.
Set the Format for the Rule
There are various steps to set the format for the rule:
Step 1. To set the format for the rule first, from the conditional formatting window, we have to click on the option this format. The below figure shows how the formatting option is displayed within the window:
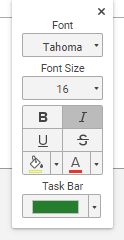
We can apply formatting based on the requirement means we can use formatting only on a particular column in the row or the entire rows. If we do not define the limit of the formatting when it takes place, then, by default, the formatting will be applied on the entire row.
Step 2. Next, click on the OK.
Formatting Options
The below table shows the various type of formatting options that we use for the formatting:
| Option Name | Use of the Option |
|---|---|
| Font Type and Font Size | Font type is used to set the type of the font such as Arial, Times, Verdana, Tahoma, or Auto. Font size is used to change the size of the font. |
 | Bold, italics, underscore, and strike through are used for the font. |
 (Background) (Background) | The Background option is used to apply the background color to the cells. |
 (Font color) (Font color) | Used to apply a color to the font |
Add a Condition, Clone, or Rearrange a Rule
Add a Condition
There are various steps to add a condition:
Step 1. First, on the toolbar, click on the Conditional Formatting icon.

Step 2. Then, to view the additional options, click on the drop-down arrow, which appear in the left side of the rule in the conditional formatting window.
Step 3. Next, select Add Condition (Add) to add conditions to a rule.
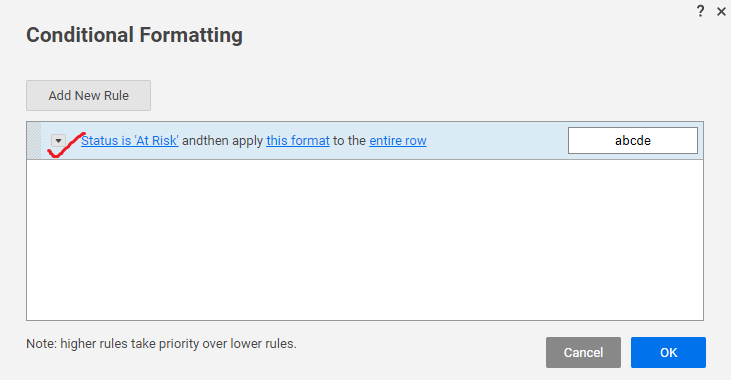
The Add condition (AND) rule is used to apply an "AND" operator in the rule, which indicates that there are various conditions that should be met for the format to be applied.
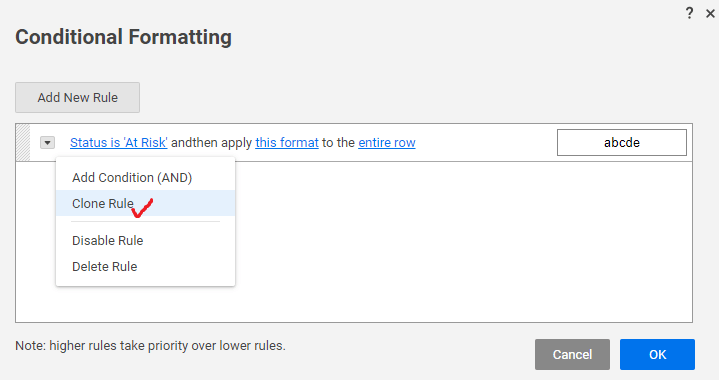
Clone a Rule
Cloning a rule means copy an existing rule so that it can be used in a similar new rule. If we want to clone a rule, click on the drop-down, which is on the left of the rule, and then select the cloned rule.
Rearrange Rules
If we want to execute the rule in a specific order, then we can rearrange the rule. So, to rearrange the rule, click and drag on the rules up or down in the list.
Delete or Disable a Conditional Formatting Rule
There are various steps to delete or disable a conditional formatting rule:
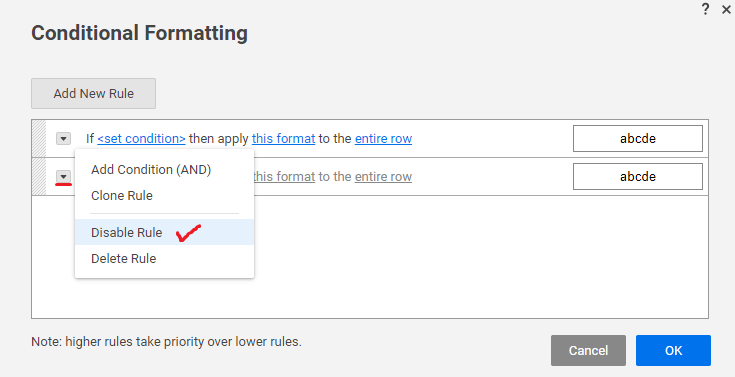
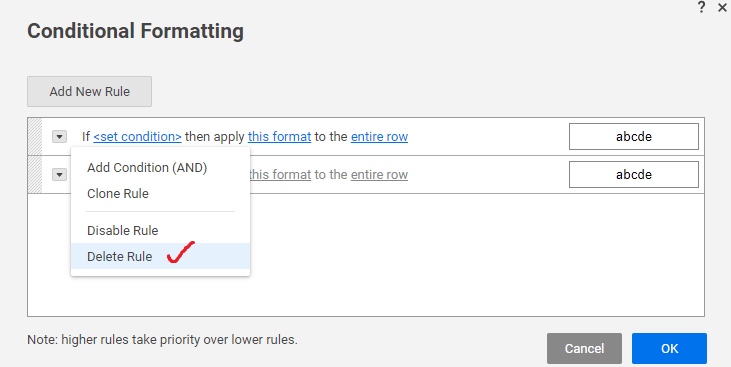
Step 1. First, on the toolbar, click on the conditional formatting icon. When we click on the conditional formatting icon, then the list of all the existing rules will appear.
Step 2. Next, select one of the following:
- To temporarily turn off: We use a Disable option if we want to use the existing rule later. If we want to disable the rule, click on the drop-down arrow and select Disable Rule. If we want to again use that rule which we disabled, click on the option Enable Rule.
- To Delete the Rule Entirely: If we want to delete the rule permanently, then use the option To Delete the Rule Entirely. To use this rule, we have to click on the drop-down arrow and select the Delete Rule option.
Formula Basics
Smartsheet provides the facility of the formula's so that we can perform the calculations. We can apply the formula on the numeric values and values contained within the cells. With the help of the formulas, we can also automate symbols and drop-down fields.
Create and Edit Formulas in Smartsheet
In Smartsheet, formulas are used to calculate the numeric values and automate aspects of the sheet.
Create a Formula
There are various files types which we use to create a formula:
- Text/Number
- Contact List Fields
- Date
- Dropdown List
- Checkbox
- Symbol
We can place a formula in a file with the help of the following:
- Select the file.
- Then, in the field, type the equal sign, and then type the calculation.

- When the formula is typed, then press the enter button. The result will be displayed as:

Functions
Formulas may also contain functions like: SUM, AVG, etc. With the help of the function, we can perform calculations and data manipulation in the smartsheet.
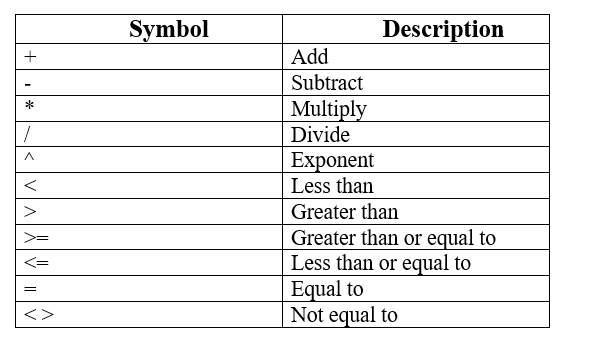
Formula Operators
There are various types of operators we use in the Smartsheet formulas:
Edit an Existing Formula
We have to follow the following steps to edit an existing formula:
Step 1. First, double-click on the cell, which comprises the formula to edit the formula.
Step 2. Then, edit the formula and press the Enter key.
Work with Percentage
In the Smartsheet, the percentage is treated as a value between 0 and 1. If we want to create a formula for percent, then we have to use decimals values.
For Example: =0.5 + 0.4
It will give you 90% in a column formatted for percentage.
= 5+4
It will give you 900% in a column formatted for percentage.
Copy a Formula with Drag-Fill or Auto-Fill
If there is any formula that we want to use in the multiple fields without typing the formula manually, then we have two methods. First is Drag fill, and the second is Auto-fill.
- Drag-Fill: - In the drag-fill method, if we want to copy a formula in the sheet, then drag the formula from the lower-left corner of the selected filed. When the formula is copied, then automatically formula will change its respective field references.
- Auto-Fill: - The auto-fill method is used when we want to automatically copy the formula into the desired field. When we use auto-fill, then automatically new formula changes its respective filed references.
Areas Where Formula Use is Restricted
There are various fields where the formula cannot contain:
- Contact list fields that we used in resource management.
- Default columns (Row Action Indicator, Comments, Attachments).
- System Fields (such as Modified By).
- There are various fields which we use for resource management and dependencies:
- Predecessors
- Duration
- Start Date
- End Date
- % Allocation
- % Complete
Features where Formulas Cannot be Edited
In the Smartsheet, there are various features where we cannot edit the formulas:
- Forms
- Reports (In reports, we can only view the formula result, but we cannot edit the formula).
- Update Requests (In Update Requests, the result of the formula is the only view, but we cannot edit the formula).
- Dashboard (In Dashboard, we can only view the formula result, but we cannot edit the formula).
Features where Formulas Cannot be created
In the Smartsheet, there are various features where we cannot create the Formulas:
- Forms
- Reports
- Update Requests
- Dashboard
0 Comments